Practice: A Plywood Guitar
- William Briger

- Dec 18, 2020
- 3 min read
Updated: Dec 22, 2020
Now that I have a plan, I wanted to learn to use the tools, for the purpose of safety and a higher quality product. Below I will explain my process of making a guitar from plywood to learn the skills necessary to make my final product. I will also talk about my mistakes and the most important lessons I learned
Step #1: Prepping the plywood
To ensure I got as good practice as possible with my tools, I worked to make my plywood guitar blank as close to the same as the Swamp Ash I would use later. This meant I had to clamp and glue multiple pieces together to get the right depth.


Step #2: Getting the shape onto the wood.
I used an already created guitar blank of the Les Paul to create a cardboard cutout of the guitar shape. One can use a to scale dimension from the internet or even a printout or orderable document with the information to trace but I already impulsively order the blank with a guitar building kit. This goes back to my post #1 idea of the importance of planning. If you do more research you will find cheaper and more effective ways to do each step. I made a mistake here and didn’t find the cheapest and easiest way to find the right shape. After I traced the shape onto the cardboard, I clamped and traced the cardboard cutout onto the plywood I wanted to use to make my first guitar.
Important Note:I made another huge mistake here. I used sharped to trace the design onto the wood. I could not get rid of sharpie until I sanded for a whole class period so I learned the importance of using pencil to trace anything.


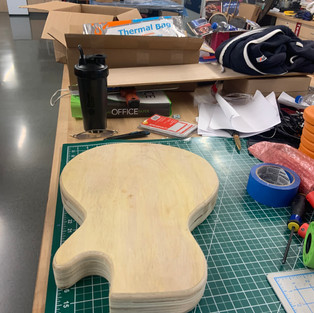
Step #3: Reciprocating Saw: Here I used a reciprocating saw to cut the traced outline out and have the rough draft body of my plywood guitar. During this step, I really learned the importance of going slow. I learned this because I cut at an angle and somewhat screwed up the walls but nothing serious. I also learned a new trick about the importance of using air. It's hard to follow the line as the sawdust builds up but using the air compressor to blow. This is proof of the importance of learning the tools because I would have screwed up the line on my real wood if not.


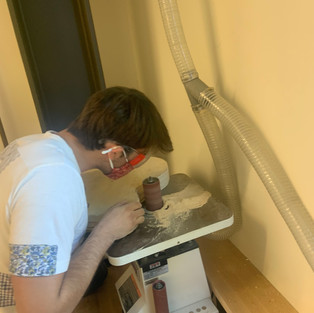
Step #4: Spindle Sanding: The majority of the rest of the project now is sanding. Sanding is my favorite part. It's low stress because it's hard to mess up and it's relaxing to me. However… somehow I still screwed up the sanding. I did not recognize that spindle sanders had an angle change mode and I was sanding at the wrong angle (it should’ve been 0º). This again goes to show make sure you know the tool before you use it. As a result I was actually making the slope of the sides even greater than I did with reciprocating saw. Eventually, I realized the mistake I was making and adapted to fix both the reciprocating saw cut issues and angular issues. This was the first major adaptation I had to make on my project and though I was angry at myself, I learned to really make the guitar my own, I need to mess up and have some original “flare.”

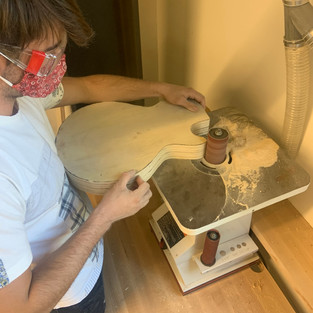

Step #5 Orbital sanding: This part needs minimal explanation. Orbital sanding was to make the surface feel nicer and is impossible to mess up. It helped me get rid of some kinks and mistakes I made earlier though. It's good to realize that even if I mess up on other steps I have sanding to help me improve.


Step #6: Drilling: Originally I thought the best way to the tech holes would be to drill them out and then use a chisel to take out the rest of the wood. I tried this method, just wanting to see what would happen. This method was slow and made the inside look imperfect and messy. I brainstormed with Mr. E until we decided the best strategy would be to use a router.


Step #7: Routing the tech pieces: Now that I had my body, the next steps were about precision and attention to detail. I spent time making a bunch of measurements so I could cut the route in the right spot. This part was stressful and made me nervous about messing up so I decided to practice on a blank slab of wood. I improved my skills, remembering to use air from the reciprocating saw step, and got the trust to do it on the actual body. I decided I was good enough and could move onto the real wood, (not practicing the pickup spot shape but just the tool).


Comments